Painting Winter Scenes in Watercolor
You can paint winter scenes using several techniques in watercolor. Here, I would like to show you just a few to try. You will need: Arches 140 lb. cold press watercolor paper (or similar quality paper), table salt, a scraper (cut up credit card, beveled-edge paintbrush handle, dull knife, etc.), masking fluid, white acrylic paint, an old toothbrush, brushes and watercolor paints.
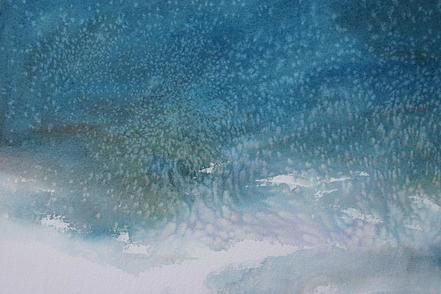
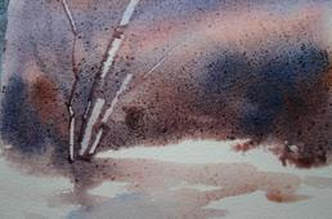
Snowstorm scenes are a lot of fun to paint. Choose your paint colors before you start. I recommend using colors that can create good darks (often these are staining colors). Some ideas are: alizarin crimson, prussian, pthalo, ultramarine, or antwerp blue, burnt umber or sienna, indigo, etc. Using a large flat brush, wet your paper and lay it on a board. Let the water soak in for a few minutes, then lay down color with a damp, not dripping, brush. Use two or three colors. Leave the bottom of the paper mostly white, for snow. Let the color soak in for a few minutes, then sprinkle salt over the entire paper (see the first two images). The wetter your paint and paper are, the more "blizzard-like" the scene will appear. In the second painting, see how I scraped out a tree. This was done with my scraper (see supplies, above), after the salt was sprinkled on and the paper was beginning to dry. Dry your paper, and then add some details, a figure, or anything you like to create interest.
Snowstorm scenes are a lot of fun to paint. Choose your paint colors before you start. I recommend using colors that can create good darks (often these are staining colors). Some ideas are: alizarin crimson, prussian, pthalo, ultramarine, or antwerp blue, burnt umber or sienna, indigo, etc. Using a large flat brush, wet your paper and lay it on a board. Let the water soak in for a few minutes, then lay down color with a damp, not dripping, brush. Use two or three colors. Leave the bottom of the paper mostly white, for snow. Let the color soak in for a few minutes, then sprinkle salt over the entire paper (see the first two images). The wetter your paint and paper are, the more "blizzard-like" the scene will appear. In the second painting, see how I scraped out a tree. This was done with my scraper (see supplies, above), after the salt was sprinkled on and the paper was beginning to dry. Dry your paper, and then add some details, a figure, or anything you like to create interest.
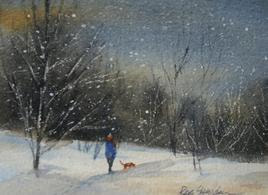
The third image did not use salt, but was started by wetting the sky/background area. While this was still damp, blues and yellow ochre were washed in for the sky. As this was drying, a deep grey color was made using the ochre, burnt sienna, ultramarine blue, and alizarin crimson. This was painted on top of the sky color, to create distant trees. Pick up your board and let the grey move into the damp sky, to create the fuzzy treeline. Dry the paper. Next, dark trees and a figure and dog were added. You can also paint soft shadows in the snow. Dry the paper. Using a rigger, add snow on some of the tree branches. Load up the toothbrush with a little watery white acrylic paint. Practice running your thumb over the toothbrush to create snow, using scrap paper. When you are ready, cover the entire scene with the "snow".
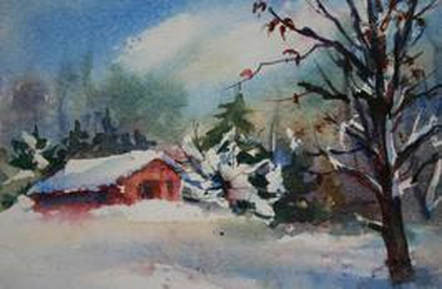
Or, maybe you are in the mood to paint a bright, cold, sunny day. The last two images show two ways to do this. The scene with the red barn was used masking fluid to protect the whites on the barn and trees. Let the fluid dry before you paint the scene. You can paint right over masking fluid, and then peel it off when the paint has dried. You may want to soften some of the hard edges that are left by the masking fluid. Do this with a wet scrubber brush.
Or, maybe you are in the mood to paint a bright, cold, sunny day. The last two images show two ways to do this. The scene with the red barn was used masking fluid to protect the whites on the barn and trees. Let the fluid dry before you paint the scene. You can paint right over masking fluid, and then peel it off when the paint has dried. You may want to soften some of the hard edges that are left by the masking fluid. Do this with a wet scrubber brush.
The last image is painted without masking fluid. The snow-covered trees were drawn first, and then the background was painted, going around the whites. This was dried, and then soft shadows of blue, violet, and green were painted on the snowy clumps. Again, dry the paper, and then paint the green boughs, avoiding the white snow clumps. Add whatever you like, to finish the painting.
Play around with these (and other) techniques to paint your backyard, your winter photos, etc. It is a great way to spend a winter day!
Join me in my classes to learn more! Here is a link to my upcoming classes.
Copyright Peg Sheridan
Play around with these (and other) techniques to paint your backyard, your winter photos, etc. It is a great way to spend a winter day!
Join me in my classes to learn more! Here is a link to my upcoming classes.
Copyright Peg Sheridan


